Best Photos to Use on Your Childcare Website
A guide to selecting and using images that showcase your daycare professionally and authentically.

Best Photos to Use on Your Childcare Website
A picture is worth a thousand words—but on your daycare website, it might be worth a thousand dollars in new enrollments.
Parents don't just read about your center. They see it. Before they schedule a tour, before they talk to your director, before they even know your rates—they've scrolled through your photos and formed a judgment.
The question is: what judgment are they forming?
This guide covers exactly which photos build trust, which photos destroy it, and how to capture images that make parents say, "I want my child here."
Why Photos Make or Break First Impressions
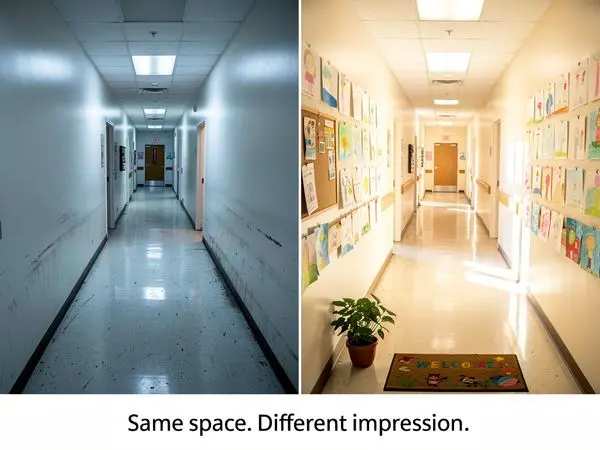
Humans are visual creatures. We process images 60,000 times faster than text. In the time it takes a parent to read your mission statement, they've already scrolled through 20 photos and decided whether to keep reading.
What Photos Communicate
Your photos tell parents:
- Is this place clean and safe? (Messy rooms, cluttered shelves = red flags)
- Is this place warm and nurturing? (Staff faces, child expressions)
- Is this place modern? (Updated equipment, bright spaces)
- Is this place for families like mine? (Diversity, representation)
- Is this place authentic? (Real photos vs. staged perfection)
The Trust Factor
Parents are leaving their child with strangers. Photos are their first proof that your center is real, safe, and loving.
Generic stock photos don't build trust—they erode it. Parents have seen the same "diverse kids smiling at camera" image on a hundred websites. They know it's not your center.
Real photos = real trust.
The Enrollment Impact
Centers with authentic, high-quality photos report:
- 40% more tour requests (parents are pre-sold before visiting)
- Higher conversion rates (tours become enrollments more often)
- Shorter decision timelines (parents move faster when they're emotionally connected)
- Better-quality leads (parents who've seen real photos know what to expect)
Real Photos vs. Stock Photos: The Comparison
Let's be direct: stop using stock photos.
Why Stock Photos Fail
| Issue | Stock Photo Problem | Parent Reaction | |-------|---------------------|-----------------| | Authenticity | Kids are models, not your students | "This isn't their actual center" | | Relatability | Perfectly diverse, perfectly dressed | "This feels fake" | | Trust | Same photos on 50+ websites | "What are they hiding?" | | SEO | Generic alt text, duplicate images | Google ranks you lower | | Emotion | Smiles look forced | No emotional connection |
Why Real Photos Win
| Benefit | Real Photo Advantage | Parent Reaction | |---------|---------------------|-----------------| | Authenticity | Actual children, actual spaces | "This looks like a real place" | | Relatability | Imperfect, genuine moments | "I can see my child here" | | Trust | One-of-a-kind images | "They're confident enough to show the real thing" | | SEO | Unique images, specific alt text | Google ranks you higher | | Emotion | Candid joy, real interactions | "This feels like a loving place" |
The Bottom Line
A grainy, imperfect photo of real children playing at your center beats a glossy stock photo every single time.
What Makes a Great Daycare Photo
Not all real photos are created equal. Here's what separates compelling images from forgettable ones.
The Five Elements of Great Daycare Photos
- Natural Light
- Real Interactions
- Clean but Realistic Environments
- Genuine Expressions
- Variety
Technical Tips (Non-Photographers Welcome)
- Shoot horizontally for website banners (landscape orientation)
- Shoot vertically for social media and detail shots (portrait orientation)
- Get low (kneel to child's eye level for more intimate shots)
- Avoid cluttered backgrounds (move the trash can, close the cabinet)
- Take more than you need (you can delete later—don't miss moments)
- Focus on faces (blur backgrounds if your phone allows portrait mode)
- Hold steady (blurry photos can't be fixed)
- Use burst mode for action shots (capture the perfect moment)
- Clean your lens (phone cameras get smudgy—wipe before shooting)
Planning Your Photo Shoot Day
Whether you hire a professional or DIY, planning makes the difference.
Before the Shoot
One week before:
- [ ] Send reminder to parents about photo permissions
- [ ] Plan your shot list (which rooms, which activities)
- [ ] Check weather (for outdoor shots)
- [ ] Brief staff on natural behavior (no "performing" for camera)
- [ ] Clean and organize spaces (but don't make them sterile)
The night before:
- [ ] Charge all devices
- [ ] Clear storage space (delete old photos if needed)
- [ ] Confirm permissions are on file
- [ ] Prepare simple release forms for any new families
The Day of the Shoot
Best times:
- Morning (9-11 AM): Children are fresh, engaged, and cooperative
- After nap (3-4 PM): Second wind, good energy
- Avoid: Right before lunch (hangry kids), during transitions
Shot sequence:
- Start with empty classroom shots (easier to stage)
- Capture circle time or group activities
- Move to individual learning/play moments
- Outdoor play (energy and movement)
- Staff portraits and interaction shots
- Meal or snack time
- Building exterior and common areas
Communication Tips
Tell staff:
- "Ignore the camera and focus on the children"
- "Act naturally—we want real moments, not posed ones"
- "If a child is upset, comfort them as usual—these moments are real too"
Tell children:
- Nothing. Let them be themselves.
Photos Parents Want to See: The Complete List
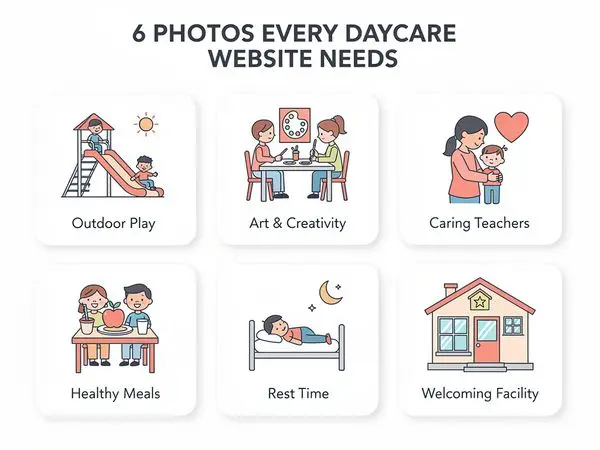
1. Classroom Spaces
Parents want to visualize where their child will spend their day.
Must-have shots:
- Wide angle showing entire room (capture the full space)
- Reading nook or cozy corner (comfort and literacy)
- Art supply area (creativity and independence)
- Cubbies or storage with children's names (personalization)
- Circle time area with rug (community and routine)
- Learning centers (blocks, dramatic play, science, sensory)
- Teacher's desk or workspace (supervision and organization)
What to avoid:
- Empty rooms (look abandoned)
- Overly perfect organization (look staged)
- Dated furniture or worn carpet (update if possible)
- Cluttered or chaotic spaces (feels overwhelming)
2. Outdoor Play Areas
Outdoor space is a huge selling point for many parents.
Must-have shots:
- Playground equipment from multiple angles
- Children actively using equipment
- Shaded areas (important for hot climates)
- Riding toys or tricycles
- Garden or nature area (shows outdoor learning)
- Safety surfacing (mulch, rubber mats, sand)
- Fenced perimeter (security visible)
- Seasonal elements (leaves in fall, sprinklers in summer)
What to avoid:
- Empty playgrounds (where's the fun?)
- Visible safety issues (rusted equipment, broken fences)
- Poor drainage or muddy areas
3. Meal and Snack Areas
Food is a daily touchpoint that matters to parents.
Must-have shots:
- Clean dining tables and chairs
- Children eating (with permission—shows real meals)
- Kitchen or food prep area (if commercial grade)
- Menu board or posted meal plan
- Children helping with setup or cleanup
- Family-style dining (passing bowls, serving themselves)
- High chairs or booster seats for younger children
What to avoid:
- Messy, chaotic scenes
- Unappealing food presentations
- Unsafe practices (children without supervision)
- Bottles or food that look unrefrigerated
4. Nap and Rest Areas
For infants and toddlers especially, nap spaces are crucial.
Must-have shots:
- Individual cribs or cots (labeled with names)
- Soft lighting or blackout curtains
- Clean, fresh bedding
- Sound machine or white noise device visible
- Teacher supervising (gently, not hovering)
- Soothing elements (mobiles, dim lamps, soft music notation)
What to avoid:
- Cluttered or crowded sleep spaces
- Visible hazards (loose blankets for infants, stuffed animals in cribs)
- Poor lighting (looks gloomy or unsafe)
- Overhead fluorescent lights (harsh for sleep)
5. Staff Photos
Parents want to know who will care for their child.
Must-have shots:
- Individual teacher photos with warm smiles
- Teachers interacting with children
- Group staff photo (shows team unity)
- Director and leadership team prominently featured
- Name badges visible in photos
- Teachers doing what they do best (reading, hugging, guiding)
What to include in captions:
- First name (creates familiarity)
- Role/age group they work with
- Years of experience (builds credibility)
- Brief personal detail ("Ms. Rosa loves reading stories")
- Certifications if relevant ("CDA certified," "First Aid trained")
What to avoid:
- Stiff, corporate headshots
- Sunglasses or hats (hides faces)
- Dated photos (update every 2 years)
- Staff without names (anonymous = impersonal)
6. Special Activities
Show the richness of your program beyond the basics.
Must-have shots:
- Art projects (painting, sculpting, crafting)
- Music and movement (instruments, dancing)
- Science experiments (magnifying glasses, nature exploration)
- Guest visitors (firefighters, librarians, zoo animals)
- Field trips or outdoor exploration
- Holiday celebrations (diverse holidays represented)
- Sensory play (water tables, sand, playdough)
- Building and construction (blocks, Legos, forts)
7. Family and Community
If you have family events, document them.
Must-have shots:
- Parent-child events (Mother's Day, Father's Day celebrations)
- Graduation ceremonies (cap and gown moments)
- Family potlucks or picnics
- Parent volunteers in the classroom
- Community partnerships (local library visits, charity drives)
- Multi-generational moments (grandparents visiting)
8. The Building Exterior
First impression when parents arrive for a tour.
Must-have shots:
- Front entrance with signage (clear, professional)
- Parking area (shows convenience and safety)
- Curb appeal (landscaping, paint condition, cleanliness)
- Safety features (fenced perimeter, secure entry, buzzers)
- Seasonal variations (spring flowers, fall leaves, summer greenery)
- Directional signage (helps parents find you)
Photo Equipment for DIY Photography

You don't need expensive gear. Here's what helps:
Smartphone Photography (Recommended)
Most modern smartphones take excellent photos. Tips:
- Use the main camera (not selfie camera) for best quality
- Clean the lens before every session
- Use portrait mode for staff photos (blurred background)
- Turn off flash (natural light is better)
- Use grid lines for composition (enable in settings)
Helpful Add-Ons
- Ring light ($30-50): Improves indoor lighting dramatically
- Phone tripod ($15-25): Steadies shots, allows timer photos
- Reflective board ($10): Bounces light into shadowy areas
- Extra storage: Cloud backup or external drive for organization
Professional Gear (If Hiring)
If you hire a photographer, they'll bring:
- DSLR or mirrorless camera
- Multiple lenses (wide for rooms, portrait for staff)
- External flash (for dark indoor spaces)
- Light reflectors
- Backup equipment
Photo Equipment for DIY Photography
You don't need expensive gear. Here's what helps:
Smartphone Photography (Recommended)
Most modern smartphones take excellent photos. Tips:
- Use the main camera (not selfie camera) for best quality
- Clean the lens before every session
- Use portrait mode for staff photos (blurred background)
- Turn off flash (natural light is better)
- Use grid lines for composition (enable in settings)
Helpful Add-Ons
- Ring light ($30-50): Improves indoor lighting dramatically
- Phone tripod ($15-25): Steadies shots, allows timer photos
- Reflective board ($10): Bounces light into shadowy areas
- Extra storage: Cloud backup or external drive for organization
Professional Gear (If Hiring)
If you hire a photographer, they'll bring:
- DSLR or mirrorless camera
- Multiple lenses (wide for rooms, portrait for staff)
- External flash (for dark indoor spaces)
- Light reflectors
- Backup equipment
Photo Quality Checklist
Before uploading any photo, ask:
- [ ] Is the image in focus? (Blurry = unprofessional)
- [ ] Is the lighting adequate? (No dark shadows or harsh glare)
- [ ] Are children's faces clear? (If you have permission)
- [ ] Is the environment clean and safe? (No hazards visible)
- [ ] Does this show authentic activity? (Not staged)
- [ ] Is there variety from other photos on the site? (Different shots)
- [ ] Is the file size reasonable? (Under 500KB for web)
- [ ] Is the aspect ratio appropriate? (Horizontal for banners, etc.)
- [ ] Is there a clear subject? (Not too busy or cluttered)
- [ ] Would a parent feel good seeing this? (Emotional resonance)
Avoiding Photo Clichés
Some photo types are overused and undermine authenticity.
Clichés to Avoid
- The Perfect Circle - Kids sitting in perfect circle, all smiling at camera
- The Finger Paint - Child with paint all over face, looking delighted (overdone)
- The Cookie Cutter - Identical activities, identical expressions in every shot
- The Diversity Checklist - Obviously staged multi-ethnic groups
- The Sterile Room - Perfectly organized, no signs of actual children
- The "Learning" Shot - Child pointing at alphabet poster (feels forced)
What to Capture Instead
- Candid moments - Children absorbed in play, unaware of camera
- Real mess - Art supplies out, books on floor, toys in use
- Genuine interactions - Teacher helping, child sharing, friends hugging
- Imperfect moments - A child concentrating, a toddler exploring, a baby discovering
- Signs of life - Half-finished projects, ongoing activities, daily routines
- Emotional moments - Comfort, joy, discovery, connection
Staff Photos That Build Trust
Your staff photos deserve special attention. They're among the most-viewed images on your site.
Individual Staff Photos
Do:
- Use natural lighting (near a window)
- Capture genuine smiles (tell a joke, ask about their kids)
- Show personality (Ms. Jennifer holding a book, Mr. David with a basketball)
- Include name and role in caption
- Keep backgrounds simple and consistent
- Use the same style for all staff (cohesive look)
Don't:
- Use selfies or low-quality phone photos
- Photoshop heavily (parents notice over-editing)
- Use photos from 5 years ago (update every 2 years)
- Include sunglasses, hats, or face-obscuring items
- Crop awkwardly (leave space around the face)
Staff-Child Interaction Photos
These are gold. They show your teachers doing what they do best.
Great moments to capture:
- Teacher reading to a small group
- Staff member comforting a child
- Teacher helping with a task (putting on shoes, washing hands)
- High-fives and celebrations
- Quiet moments of connection (a hand on a shoulder, a hug)
- Teacher kneeling to talk at eye level
- Shared laughter
FAQ: Photo Questions Answered
Do I need professional photography?
Not necessarily. Modern smartphones take excellent photos. If your budget allows, a professional photographer for one half-day can capture images that last years. But don't wait for "perfect"—good real photos beat perfect stock photos.
How do I handle photo permissions?
Have parents sign a photo release at enrollment. Make it opt-out (assumed permission unless declined) to maximize participation. Always respect opt-outs. Keep a list of children who cannot be photographed.
What if some parents don't want their child photographed?
That's fine. Focus on children with permission. You can also capture scenes where faces aren't visible (back of heads, hands working, group shots from behind). Don't exclude children—just be strategic about angles.
How often should I update photos?
At minimum, annually. Ideally, seasonally. If your homepage still shows summer camp photos in January, it signals inactivity. Fresh photos show an active, vibrant program.
What resolution should I use?
For web: 1200-1600px wide for banner images, 800px wide for inline images. Compress to under 500KB. Large files slow your site and hurt SEO. You can compress images using free tools like TinyPNG or Squoosh.
Can I use photos from parents?
With permission, yes. Parent-taken photos from events can be great for authenticity. Just ensure quality is adequate (not blurry, dark, or low resolution).
What about video?
Short videos (15-30 seconds) are incredibly powerful. A tour of the infant room. Circle time in action. Outdoor play. These don't replace photos—they complement them. Even simple smartphone video can be effective.
Should I watermark my photos?
Generally no. Watermarks look dated and can feel defensive. If you're worried about theft, the reality is that most daycares don't have images worth stealing. Focus on quality over protection.
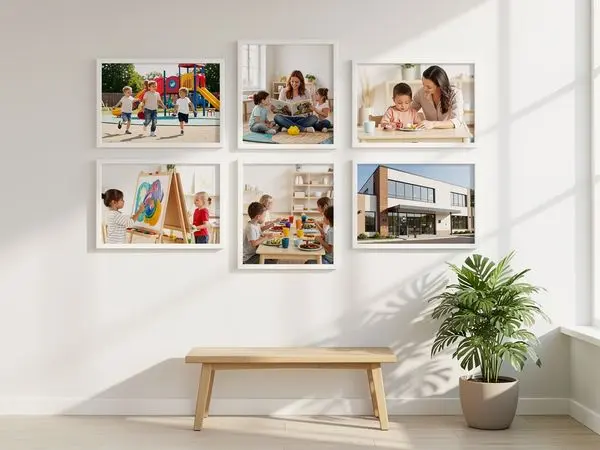
How many photos should I have on my website?
Homepage: 3-5 rotating hero images, 1-2 inline photos Programs pages: 5-10 photos per age group Gallery page: 20-30 photos maximum (quality over quantity) Total: 40-60 high-quality photos across the entire site
Conclusion: Your Photos Are Your Story
Every photo on your website tells a story about your center.
The question is: what story are you telling?
Are you telling a story of warmth, authenticity, and joyful learning? Or are you telling a story of generic childcare and stock-photo perfection?
Parents want to see the real thing. They want to imagine their child in your spaces, with your teachers, in your community.
The photos that show that? They don't just fill space on a website. They fill your classrooms.
---
Ready to Showcase Your Center?
At Valley Daycare Sites, we help childcare centers create websites that capture what makes them special. We know which photos convert browsers into bookers—and we'll help you organize and present your images for maximum impact.
Get your free sample homepage at valleydaycaresites.com
Because your center deserves to be seen—the real, authentic, beautiful version of what you do every day.
Ready to Transform Your Daycare Website?
Get a free sample homepage designed specifically for your daycare. No upfront cost, no pressure.
Get Your Free Sample

